Showing posts with label Inspiration. Show all posts

Tuesday, June 25, 2013

The Great Lobster Invitation Reveal

My biggest DIY undertaking for the wedding was definitely our invitation suite. I designed the whole thing with a little help from some purchased stock images. By the time I created this gem, I had already completed at least six other designs. Since Mr. Rucksack and I couldn't agree, it was back to the drawing board. Maybe someday I'll open an Etsy shop so that all of those designs don't go to waste. I thought some of them were pretty darn cute:
A small sample of my nixed creative work
I decided to go back to our Save the Date roots and incorporate the lobsters again. I mean, who doesn't love an adorable lobster? I also stayed with the navy and white color scheme to appease Mr. Rucksack since he wasn't a fan of the pink and aqua colors I had used in the other invitation sets I created. After playing around with layouts, I went with a tri-fold card with lots of lobsters and shells:
The front of the invitation
Partially opened

All the deets
Back of the postcard Response Card

Invitation & Response Card
The whole suite, including the thank you card
For some reason, I naively thought that designing our invitations would actually save us money. (Our Save the Dates had been so inexpensive!) What I didn't consider was that we were now a) printing on both sides b) using much longer paper that had to be cut down to accommodate our 6x18 cards and c) having folds included. Folds cost money. Mad money. I was able to negotiate the price a little so they weren't ridiculously expensive, but we definitely could have saved money (and time!) by going the stock online route.


I used Allegra out of New Haven to print everything because I’ve worked with them for years through both my day job and my outside design work. They were wonderful to work with as always, but I was a little disappointed with how long it all took. They were a few days late on both of the proofs and then a day late on the final invitations. We were cutting it close to the advised 6-8 week mark as it was, so I was panicking a little. Everyone’s incessant nagging of “where’s my invitation?” did not help matters.

They ended up going out at the 7 week mark which Miss Manners assures me is just fine. And I have to tell you, all of the praise we've received made them seem well worth the wait and the price.

One of my favorite parts of the invitation was our envelope. In Photoshop, I manipulated our lobster graphic from the invitations so that his claws would hold our stamps. The body wrapped around the top of the invitation and became part of our address label. I know I would smile if I had a little lobster delivering my mail!


Did you DIY your invitations? What was your biggest challenge?

Monday, March 25, 2013

Our Peg People Cake Topper

One of the things I am most excited about is our cake buffet. Although I'm not a big fan of eating cake, I just love the idea of it. It's kind of like eggnog in December. Every year I get wildly excited when I see eggnog invade the grocery store shelves and every year I finish about half a cup before declaring "Over it!" and moving on to another holiday novelty.

Still, cakes are just so pretty and a cake buffet is my dream. It's both beautiful and - since we have friends varying across a spectrum of dietary requests (paleo, vegan, chocolate, no chocolate) - it's practical too.
A beautiful assortment of sweets via Sweet Bloom Cakes
So many options via The Sweetest Occassion / Photo by Emilie Inc
I knew I wanted each cake to have a topper to make them special and originally thought about collecting an assortment of vintage toppers. In the end, I decided that would be a lot of work and wouldn't be as put together looking as I'd like. So instead, I'll be creating bunting for each cake.
Via The Sweetest Occassion
But what about our special gluten-free paleo cake? Of course, that needs something extra special. Per usual, I fell in love with a cake topper on Etsy. But at $150 it was out of our price range.
Via Lollipop Workshop
What's a girl to do?

Admittedly terrified, I decided to craft it myself. Thanks to some crafty girls ahead of me like Mrs. Armadillo and Mrs. Splatterpaint I gathered my supplies and gave it a whirl.

I was most terrified of the painting part, but it actually went pretty well! The clothes were not easy though. In the end, I think they're fine, but if I look for too long I get the urge to undo everything.

Peg people in the nude!
All dolled up. I still need to figure out a way to make a bouquet.

What's your DIY inspiration - are you an Etsy idea thief like me?

Thursday, March 21, 2013

A picture's worth a thousand words, and a photographer costs way more

Like most things I've taken on in the wedding planning process, I attacked the photography decision with a type A kind of fervor that can only be described as insane, or spectacular if you happen to be just as crazy as I am.

You see, I love the decision process and the massive Excel spreadsheets that go along with making an informed decision. It's probably why I'm a business analyst. I can spreadsheet and analyze all day long. So for me, finding a great photographer wasn't just about finding some pretty images. It was about comparing styles, prices, emotion, and reviews in a systematic way.

I started with a very specific methodology and requirements that were narrowed down as I dove into my research.

Requirements:
1. Bright, crisp images. The whole vintage Instagrammy look is really popular right now and I knew that was not for me. I want bright, not overly exposed, images.

2. Real looking photos. On the other end of the spectrum I don't like photos that are overly processed to be too bright or fake looking. Sky should be sky colored, not neon "look at me, I'm the sky!" blue.

3. That "it" factor feeling. This was one of those intangible requirements: the "I'll know it when I see it" feeling. Basically, if a photo got me to cry, get goosebumps, or to audibly say "wow" then it was a winner.

4. Low cost. Like most items on our wedding list, we had a tight budget for photography too. The cost requirement for us was under $2500.

Methodology:
Here's where I got weird with it. Most likely, the sensible place to start would have been with cost. However, I didn't want a photographer's cost to affect my thoughts about their quality. (High cost? They must be amazing! Low cost? What's wrong with them?)

So I started by judging the books purely by their covers and came up with a lovely and lengthy list of 28 photographers that I had ranked from 4-5 on my 1-5 point scale. Once I had my list, I looked up the prices or contacted the photographers for their price quotes. This was a heartbreaking process since I learned that a few of my top contenders were in the $5-7,000 range.

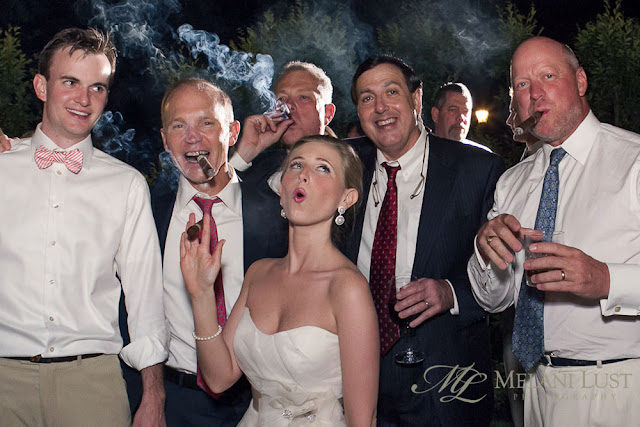
 Melani Lust made me cry twice: Once when I first saw her awesome wow factor photos, and again when she gave me her price list. Seriously, you guys:

Photos by Melani Lust
These couples look like they just stepped out of a fashion magazine. That's the look what I want.

Once I finally had my list narrowed down to the 10 photographers that were both in my price range and met all of my other requirements, I looked into availability. Now, I was really naive in thinking that 10 months was plenty enough time to book a photographer. Turns out they book up fast! Thankfully, I was still left with a nice little list of 5 photographers.

Sometimes you gotta throw it all away:
Wasn't expecting this subtitle from my super controlled methods, were you? Well, luckily fate stepped in here when one of my coworkers began to focus more on her photography career. "Say what now?" As she showed me more and more of her work, I began to become convinced that she should be our photographer. She loved all of the same photographers that I did (and even took classes with one of my favorites!), totally understood the style I wanted, and produced these amazing "Oh wow!" inspired photos.
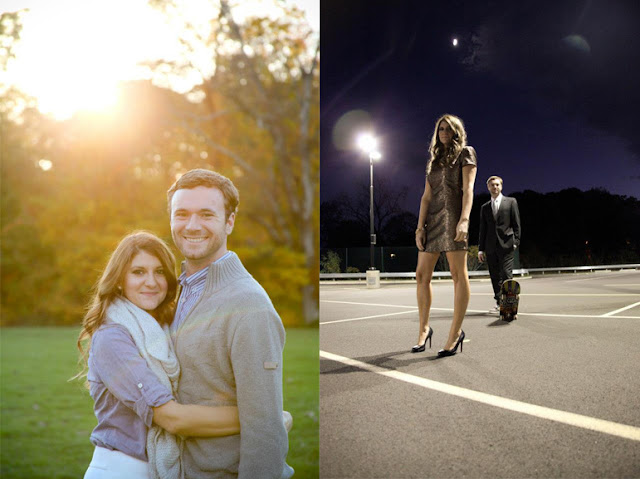
Mutual friends of Abbey's and mine who clearly should be fashion models. Engagement photos by, of course, Abigail Scott

We booked her for our engagement photos partially for fun and partially as a test run for our wedding day. The results speak for themselves:


Photos by Abigail Scott

Shortly after receiving our images we signed a contract with Abbey! She's not only amazing to work with, but she fit all of our requirements and with a lovely "friendor" discount, she even comes in significantly under budget for us! Hell freaking yeah.

So now that I picked a photographer who was not at all in my carefully orchestrated plans, do I feel like I did all of that work for nothing? Not at all! I definitely learned a lot through that process, including what I wanted and what I didn't want in a photographer. Had I not done all of that research, I don't know if I would quite as positive about putting my trust in Abbey. Plus, I now have some amazing ideas for "must have shots."


How did you pick your photographer?

Saturday, March 9, 2013

The big bad "B" word

That's right: We're here to talk about the dreaded bridesmaid dress.I don't know about you, but when I think "bridesmaid dress" I immediately think "really expensive ugly freaking dress that I will never wear again." Something along the lines of this masterpiece:

Via UglyDress.com

I think I put a lot of unnecessary stress on myself over choosing bridesmaids dresses. The girls kept insisting that they would wear anything I asked them to even if it was a paper bag, but I wanted to make sure they were happy too. That meant I wanted to keep the costs low and the chance of wearing it again high.

I was really adamant that I wanted to choose dresses that cost less than $100, but it turned out that was easier said than done. While I found some options at David's Bridal, they were still a little too "bridesmaidy" for my taste.

Since Mr. Rucksack and I are getting married on the beach, I wanted the girls to be casual and comfortable. It was also important that they match the rest of our bridal party look.

Oh hello, model version of us poorly photoshopped onto a beach:


I had visions of the girls wearing preppy cotton sundresses in navy or in seersucker, but surprise surprise those classic preppy dresses cost more than a pretty penny at $250+ each.

Lula Kate: Sassy Stripes; Lula Kate: Zoe; Coren Moore: Laurie; & Thread Shiloh
Oh pretty preppy dresses, why must you tease me so?

It took hours of hair pulling and several visits to J Crew's website fawning over their $235 Navy Cotton Cady dresses, but I finally made a random move that changed the course of my bridesmaids dresses forever.

What I had failed to do in all of my visits to J Crew was to hit that magic little button that takes you to the factory website. I know. I can't believe it took me so long either - I always love the factory!

What happened next I can assure you was like a movie moment complete with happy love song soundtrack. If my laptop and I could have run in slow motion toward each other, that would have happened too. In my head, that's exactly how it went down.

When I clicked on "Dresses" I was transported to a magical land where bridesmaids dresses cost only $50 and where they looked exactly as I had imagined.

All dresses via J Crew Factory
I immediately sent an email out to a couple of the girls for advice and as soon as they gave approval, I emailed the whole crew with ordering information. The girls will be able to choose any of the above dresses or even one of the J Crew Cotton Cady dresses from the regular site. That way I'll get a somewhat uniform look, but the girls can wear what makes them the most comfortable. And hello...$50 bridesmaid dress? That is unheard of!

I'm really excited to see which dress they each pick and can't wait to see them all together!

Did you choose matching dresses for your girls or did you have a variety of styles - or even a variety of colors?

Wednesday, March 6, 2013

Funfetti Bridesmaids Gifts

Do you remember Funfetti cupcakes?

Mmmm....sugar. Via Preppy Pink Blondie
My best friend, BM Veronica, and I were all about Funfetti in high school, baking up cupcakes for birthdays and Valentine's day and PMS and just because we were 15 year old girls craving a sugar high. Maybe's that's where my not so secret confetti obsession came in. It's this funny side of me that loves all things glitter, polka dots, and of course sprinkles (yum!).

I've been trying to buy little gifts and start DIY projects as I see them and as I have extra money available. I know that if I wait until the last minute, they will never get done! It's also a lot easier to purchase gifts $50 at a time when I see a good deal rather than trying to spend all of that money at once so close to the wedding.

When I spotted these adorable chevron clutches in our wedding colors at Pick Your Plum, I knew they'd be a perfect (and at $7.95 each, inexpensive) gift for my maids.
Via Pick Your Plum

Even though they'd be great on their own, I wanted more. More confetti! More cowbell!

Luckily, I remembered an adorable Etsy find that I though maybe....just maybe...I could DIY.

Here's the original:

Via Twinklebird's Etsy Shop
I love the confetti and the quote! But I also wanted to use my wedding colors, and not have to pay $42 a piece. So DIY I did!

$25 later, and I have 6 of these cute little boxes:


I first gathered my supplies:

1. Colorful card stock. I used shades of aqua, pink, gold and navy to represent our wedding colors and paid between 50 and 70 cents per square.
2. Ring bases. I purchased a pack of 24 for $6 from Etsy.
3. Handheld hole puncher. The office 3-hole punch left the card stock bent and morphed, but the handheld worked great.
4. Mod Podge Dimensional Magic. This stuff is so cool.
5. Ring boxes or small favor boxes. I purchased a package of blue favor boxes for $5 at Michael's.
6. Xacto Knife

Then got to work:

1. Start by punching about a million tiny confetti pieces using your handheld puncher and card stock. My plan was to punch them all during our Thursday night television line-up, but that tiny thing is surprisingly loud so I was limited to commercial punching only. My hands also got really tired by the time Parks & Rec came on.

2. Once you have a sufficient amount of confetti, begin assembling your "jewels." I used some of my scrap booking glue (the same stuff I used for our Save the Dates) to hold two pieces of confetti together. (You could probably also use a bit of the Mod Podge.) I found the best way was to dab some glue on a piece of paper and then run the confetti through it so it gets an even coat. Then I stuck it to a matching piece of confetti because I wanted them to be nice and strong. (This was also helpful for the gold confetti pieces since they had a white back that needed to be hidden)

3. Once you have your double-sided confetti pieces ready, it's time to Mod Podge. This part took a second to get used to, but I found the easiest method was to squeeze gently into a big drop and then to swirl onto the confetti until it was spread evenly across. The Mod Podge begins to dry surprisingly fast, so you have to work quickly.
4. Check for air bubbles in between applications! I set aside an area of paper specifically to drop off bubbles before moving onto the next jewel. If you don't, you'll end up with tiny bubbles in your jewel and it will look like a boob.

5. Wait. And Wait. And Wait. The jewels will be dry in 3 hours, but it's recommended to let them sit for 24 hours before handling. Below are my pretty jewels (I made extras just in case some of them didn't turn out) and an example of what happens when you don't pop an air bubble. (See boob in lower right corner.)


6. In the meantime, assemble the boxes. I created the ring inserts by cutting a square of card stock slightly larger than the lid and then cutting squares out of each corner so that I could fold and fit them into the boxes. The little slit was created using an Xacto knife.

7. When the 24 hours are up, apply your dried confetti jewel flat side down to the ring by using a thin coat of the Mod Podge. (I tried hot glue and failed miserably since it kept drying upon contact with the metal ring and the glue bump it left was too big) Press down firmly for a couple of seconds and it'll be dry shortly after.
I placed my finished rings in their boxes along with some extra confetti for fun and now they're set to go.

They're certainly not perfect, but I think they'll be a fun addition to the bags and the rest of the gifts.

Have you tackled any bridal party DIYs lately?

Friday, March 1, 2013

A Muddy Wedding?

It has not rained at our wedding venue on our wedding day for at least four years. I know this to be a fact thanks to the handy dandy Farmer's Almanac weather history. (Type A much?) Not that the information helps much since there are two ways to look at it:

1. It hasn't rained on our wedding day in years and has always been the perfect summer beach temperature of 75 degrees with a breeze. We picked such a beautiful day!

2. It hasn't rained on our wedding day in years and now we are due for a rainstorm! Good luck can't last forever! (Obsessive much?)

I've always believed that if I'm prepared with my raincoat and umbrella, the rain will stay at bay. But the second I walk out the door without it: Bam! Rainstorm while on a lunchtime walk across town, 2 miles from my office! True, right?

Since our ceremony is supposed to be outside, I'm starting to think of other JIC (just in case) options. Truth be told, a tiny bit of rain could be tolerable. Maybe even adorable:

Photos by The Photography Team
Image via Barefoot Beach Wedding / Photo by Comfort Studio
Aren't those brides (and umbrellas) the cutest? I could totally deal with a little sprinkle, especially if it meant a rainbow finale!


A downpour, though? No I do not think I could handle that.

Image via Barefoot Beach Wedding / Photo by Comfort Studio
What an awesome carefree bride! This, my friends, is nothing like me. 

So I guess the only option (besides wishing, hoping and praying that it doesn't rain) would be to move the ceremony inside as well. It certainly wouldn't be ideal,but I think we could make it work in a pinch, like this bride did:

Image via The Knot  / Photo by Shelly Mossman Photography
I love the circular petal aisle they created. And lucky for us, where they have a door as an altar, we actually have a fireplace. 

Obviously, we still don't have a clue what the weather will be like, but I wonder if I buy the umbrellas now - will the Universe stop the rain?

Tuesday, February 19, 2013

Anthropologie Sea Gleam Centerpiece Inspiration

Mr. Rucksack and I visited his family in Minnesota over the holidays and in addition to meeting even more of his wonderful family and eating all sorts of yummy foods we also did lots of shopping!

I can always count on FMIL Rucksack for a fun day of shopping, and this time was no exception. We stopped at the Mall of America, Crate & Barrel, CB2, West Elm, and my favorite: Anthropologie. We don't have any of my favorite stores nearby, so it was a treat!

While we were on our way out of Anthropologie I spotted the cutest Hurricane candle holders that I thought would look great as vases for our centerpieces. I quickly snapped a picture and began wondering if I could make them myself. (It turns out I can't.)

Unfortunately, they were sold out online, so back in Connecticut I dragged BM Penny with me to the closest store 45 minutes away.

With the last two remaining vases in hand, I begged the woman at the register for help and told her I was getting married. After reminding me that I better start planning soon because I don't have much time left until my wedding (thanks, lady!), she did some checking for us. It turns out that she could order a bunch more for us through their system!

Via Anthropologie
Even though they're made for candles, I think they'll look great holding our centerpiece bouquets.

Which, speaking of flowers - I have no idea what they're going to look like. I'll be using Whole Foods for my flowers and while I was able to give the florist a general idea of what we want, it will all really depend on what's in season and looks good that week. Since everything is local, the selection can totally change from week to week.

A bright summer bouquet of dahlias, zinnias, and billy balls like this may be a possibility:

Image Via Serendipity Flowers / Photo By AJH Photography
Or this fun, pink arrangement comprised of garden roses, ranunculus, freesia, billy balls, and lily of the valley:
Image Via Handmaker of Things/ Photo By K&D Photography

More zinnias:
Photo by Handmaker of Things
To be honest, it's a little exciting not knowing exactly what our flowers will look like. (I will have to remember to come back and read this when I am freaking out the night before the wedding because I have no clue what our flowers look like!)

Where did your decor inspiration come from?

Monday, February 18, 2013

Seaside Save the Dates

Can I get a quick amen for all things Etsy?

After months of attempting to design our STD cards, I finally caved in after it became apparent that I cannot paint. I had gotten it into my head that since I can do fairly decent graphic design work, that I should obviously be able to hand paint our cards. So armed with hundreds of dollars of pens, watercolor paper, canvas, and watercolors  I gave it my very best shot. And another. And another.

No dice.

I called my artist uncle for help, but he just scanned and sent me a bunch of old paintings he'd done of tropical beaches. They were gorgeous, but palm trees don't really match our New England themed beach wedding.

I searched online. I searched Etsy. I came up with nothing several times.

And then I stumbled upon an artist named Jackie Maloney and she was everything I wished I could be as an artist. Her work is cool and colorful and nautical, but it also looks so effortless. Like she just whipped something awesome up in a matter of minutes. So I sent her a flattering email with hopes that I could butter her up enough that she might draw something custom for us. Luckily she said yes and within two days, I had a lovely Save the Date in my possession!

The only inspiration I shared with her was this:

Via Momental Designs
But mostly I told her to have fun and to maybe add my dog, The Beez, into the mix.

Words cannot describe the amazing work that Jackie did for us. I think ours are even better than my inspiration pics! You guys ready to see?

I had the cards printed and cut at my favorite local printer, then assembled them at home with navy cardstock and red baker's twine. (Can you spot The Beez playing on the beach in the upper right corner? It's her favorite thing to do!)


All tied up! (Get it? Because we're tying the knot? Ha)


I had absolutely no intention of using address labels, but when the time came to use our customized address stamp, I couldn't find the ring with our new address on it! Of course I had put it "somewhere safe" and after an hour of searching still couldn't remember where that super safe place was.

So I did what any sane girl would do in my situation and I went to Best Buy and bought a printer. I know, I can't believe we didn't own a printer either. I figured it would come in handy throughout the whole wedding planning process anyway and we scored a great deal on a scanner/printer combo that's not only wireless, but that we can print with wifi from our iPads and iPhones. Awesomeness. If you're looking for a printer and scanner, definitely look into the Canon Pixma MG5420. (For what it's worth, it cost us $99 in-store.)

I'm still completely obsessed with our Save the Dates and think they really set the tone for the wedding. 

Would you commission an Etsy artist to create something for you? I love that we can now use the image for other wedding goodies!

Thursday, February 14, 2013

Preppy Beach Color Scheme

There were so many schemes we could have gone with for our little beach wedding. We considered red, white and blue. Or even a play on red, white and blue with Nantucket red and blue & white seersucker. Then we thought about doing the classic sea glass scheme with greens, blues, and white. I even briefly considered going with natural with white and tan. But it didn't take too long to settle on navy, pink, and gold. After we had our initial colors down, I started playing with PowerPoint and Photoshop - creating tablescapes with different design pieces and elements. But as much as I played, I couldn't get it quite right. That's when I realized we needed to add another color.

Every time I imagined my personal bridal style, I pictured myself adorned in gold, pink and aqua/mint jewelry. Something like these babies:

Via Etsy Seller Julianne Blumlo

It seemed only natural to add aqua mint to the mix. So we now have this lovely color scheme:

Ta-da! Colors! I think they're the perfect mix of preppy and beachy.

After the colors were refined, I played around with my growing list of inspiration pics and assembled them into a mood board using PowerPoint:


Clockwise from left to right: Navy & White Chevron, xoxo Cake via Somewhere Splendid, Navy & Pink Nautical Wedding via Green Tree Photography, Ceremony Flags via Carley Rehberg, Holla via Lil Hoot, Flamingos via Joie Lala, Tablescape via Wedding Chicks, Pink Anenome Bouquet via Elizabeth Anne Designs

Look at those flamingos! I love me some flamingos and think they'll be so cute holding signs directing guests to the ceremony and reception!

For the overall scheme, I was going for modern, but still classic. Casual, but still chic. Fun, but not too kitschy. And beachy without screaming "Hey guys! We're at the beach!" It's the Hand in my Pocket of weddings. (Broke, but I'm happy and all that.)

Did you create an inspiration board to hone in on your scheme?